Create Your Account
Create Your OrbVPN Account
One email is all it takes. Sign up with a magic code, or continue instantly with Apple or Google. Passwords are optional, and biometric passkeys make returning sign-ins a single tap.
Authentication Methods
OrbVPN gives you five ways to sign in. Your email address is your account, and the same screen both creates a new account and signs in an existing one. Choose whichever method fits your device and habits.
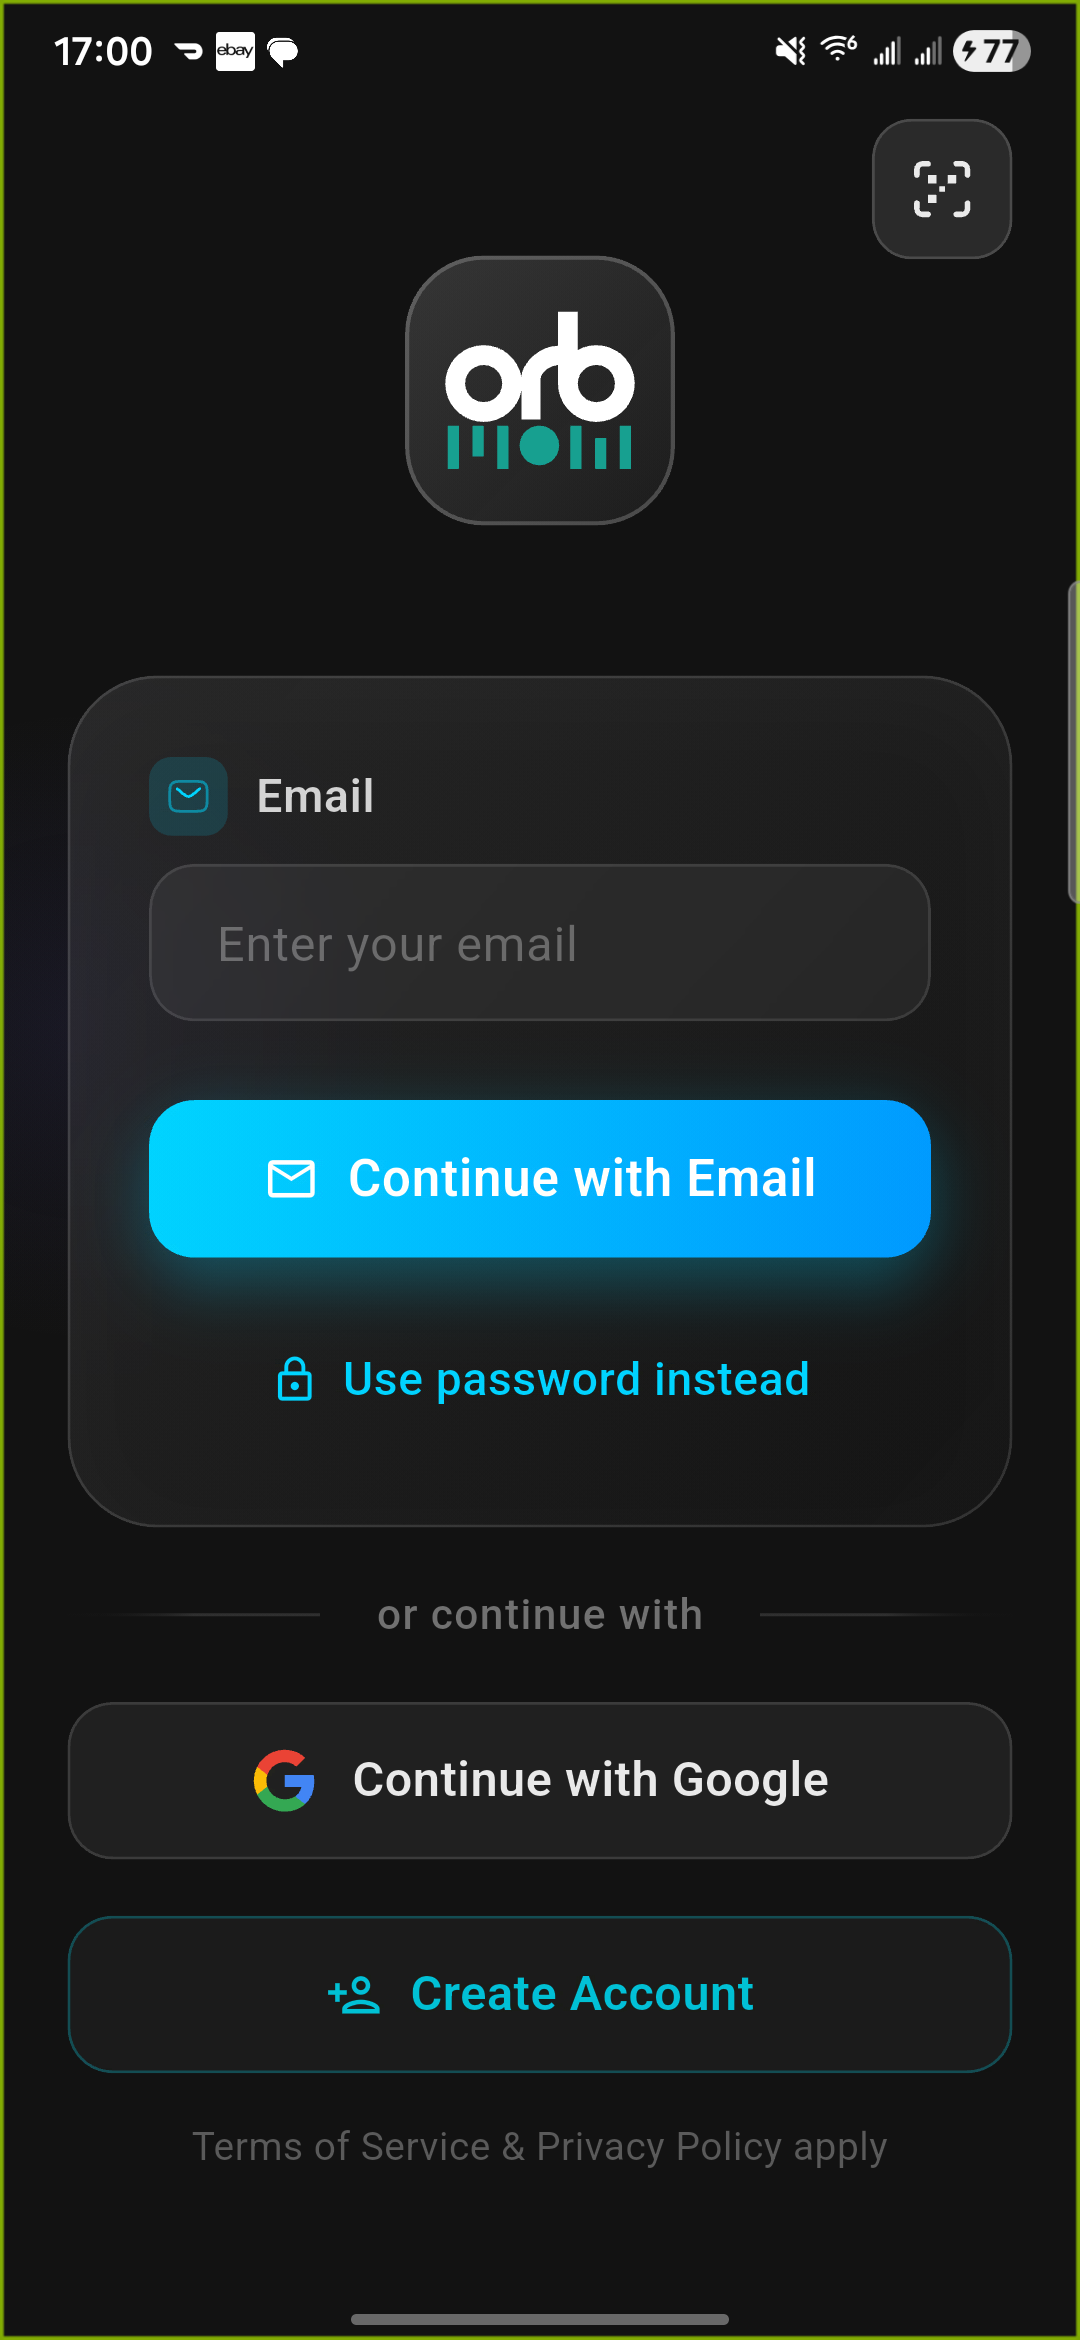
Email Magic Code
Enter your email and receive a one-time 6-digit code (and a tap-to-sign-in link). Type the code or tap the link to authenticate. No password needed.
Passkey (Biometric)
After your first sign-in, register a passkey to log in with Face ID, Touch ID, or your device's fingerprint or PIN. The fastest and most phishing-resistant option.
Password (Optional)
Prefer a traditional password? Tap Use Password Instead and sign in with your email and password, with optional two-factor authentication.
Sign in with Apple
Use your Apple ID for seamless authentication. Shown on iPhone, iPad, and Mac, with the option to hide your real email address.
Sign in with Google
Authenticate with your Google account in one tap. Available on every platform, including Android, desktop, and web.
QR Code Sign-In
Already signed in on another device? Show a QR code on one device and scan it from the other to log in instantly, with no typing required.
Apple Sign-In Availability
The Sign in with Apple button appears only on Apple devices (iPhone, iPad, and Mac), in line with Apple's platform guidelines. On Android, Windows, Linux, and TV devices you will see Google, magic code, password, passkey, and QR sign-in instead.
Method 1: Email Magic Code
The magic code method is our recommended approach. It eliminates the need to choose, remember, or type a password, reducing the risk of credential theft while keeping sign-in fast.
Open OrbVPN
Launch the OrbVPN app on your device. If this is your first time opening the app, you will see the sign-in screen with all available options.
Enter Your Email Address
Type your email address in the email field. Make sure it is an email you can access right now, as your sign-in code will be sent there. New emails automatically create a new account.
Tap Continue with Email
Tap Continue with Email. OrbVPN sends a one-time message to your inbox containing a 6-digit code and a tap-to-sign-in link. Both are valid for 15 minutes and can only be used once.
Check Your Email
Open your inbox and look for the OrbVPN sign-in message. It arrives within seconds. The app shows a waiting screen confirming the address the code was sent to.
Enter the Code or Tap the Link
Type the 6-digit code into the app, or simply tap the link in the email to be returned to OrbVPN and signed in automatically. On supported devices the code can be auto-filled from your messages.
Code or Link Not Arriving?
Check your spam or junk folder. If nothing arrives within a minute, tap Resend Magic Link on the waiting screen, or tap Use a Different Email to correct the address. Some corporate email filters may delay delivery.
How Magic Codes Work
Each sign-in message contains a time-limited, single-use code and matching link that expire after 15 minutes. Once used, they cannot be reused. Because there is no stored password, there is no credential to leak, phish, or reuse across sites.
Method 2: Passkey (Biometric Sign-In)
Passkeys are the fastest and most secure way to sign back in. A passkey replaces your password with your device's biometrics, Face ID, Touch ID, fingerprint, or PIN, and cannot be phished or reused.
Sign In Once
Sign in with a magic code, password, or social provider as described above. Passkeys are created for an account that already exists on your device.
Register Your Passkey
When prompted (for example, after a password sign-in), accept the offer to set up a passkey. Your device guides you through creating one with Face ID, Touch ID, fingerprint, or PIN.
Sign In With One Tap
The next time you open OrbVPN, your email is pre-filled and a Sign in with Passkey button appears. Confirm with your biometrics and you are in, no code, no password.
Quick Passkey Login
When OrbVPN detects a passkey for your last-used account, it can show a streamlined quick-login screen, so returning users authenticate with a single biometric tap. Passkeys are stored securely by your operating system and never leave your device.
Method 3: Password (Optional)
If you prefer a traditional password, OrbVPN fully supports it alongside the passwordless options.
Tap Use Password Instead
On the sign-in screen, tap Use Password Instead below the email button to reveal the password field.
Enter Email and Password
Type your email and password. You can toggle Remember Me to stay signed in, or tap Forgot Password to reset it via email.
Complete Two-Factor (If Enabled)
If you have two-factor authentication enabled, enter the 6-digit code from your authenticator app when prompted.
Upgrade to a Passkey
After a few password sign-ins, OrbVPN offers to set up a passkey so future logins are faster and more secure. Accepting is optional but recommended.
Forgot Your Password?
Tap Forgot Password on the password screen to receive a secure reset link by email. You can always switch back to magic-code or passkey sign-in at any time, your account works with all methods.
Method 4: Sign in with Apple
Apple Sign-In provides a privacy-focused authentication method with the option to hide your real email address. It is available on iPhone, iPad, and Mac.
Open OrbVPN
Launch the app and navigate to the sign-in screen. On Apple devices you will see the Apple and Google buttons side by side, below the email field.
Tap Sign in with Apple
Tap the Apple button. The standard Apple ID authentication sheet will appear, handled securely by your operating system.
Choose Your Email Preference
Apple gives you two options: share your real email address with OrbVPN, or use Apple's private relay email (Hide My Email). Both options work perfectly.
Authenticate with Face ID or Touch ID
Confirm your identity using Face ID, Touch ID, or your Apple ID password. Once authenticated, you are signed into OrbVPN.
Hide My Email
If you choose Apple's Hide My Email option, Apple generates a unique random email address that forwards to your real inbox. OrbVPN will never see your actual email address. You can manage these relay addresses in your Apple ID settings.
Method 5: Sign in with Google
Google Sign-In offers a fast authentication path for users with a Google account, on every platform.
Open OrbVPN
Launch the app and navigate to the sign-in screen. On non-Apple platforms the Google button spans the full width below the email field.
Tap Sign in with Google
Tap the Google button. A Google authentication window will appear where you can select or enter your Google account.
Select Your Google Account
If you have multiple Google accounts on your device, choose the one you want to associate with OrbVPN. If you are not already signed into Google, enter your credentials.
Grant Permissions
Review the permissions requested (basic profile information and email) and tap Allow or Continue. You are now signed into OrbVPN.
Method 6: QR Code Sign-In (Cross-Device)
QR sign-in lets one device that is already signed in authenticate another device, with no typing. It works in both directions and is ideal for TVs, where typing with a remote is cumbersome, but also speeds up sign-in on a brand-new phone, computer, or web session.
The QR dialog has two tabs that work together:
Display Tab
The device you want to log in shows a QR code (with a live countdown). Another device that is already signed in scans it to approve the login. Used on TVs and new devices.
Scan Tab
A signed-in device uses its camera to scan a QR code shown on another device or a web panel, instantly approving that device's sign-in.
Signing In a TV or New Device
Show the QR Code
On the device you want to sign in (for example your Fire TV, Android TV, or a fresh phone), open OrbVPN. It displays a QR code on the sign-in screen with a 5-minute countdown.
Open the Scanner on a Signed-In Device
On a phone that is already signed in, tap the QR icon on the login screen, or open the QR Code Login option and switch to the Scan tab.
Scan the Code
Point your phone's camera at the QR code shown on the other device. OrbVPN detects it automatically and confirms the login on your behalf.
You Are Signed In
The new device authenticates within seconds and lands on the Home screen. If the code times out, it refreshes automatically or you can generate a new one.
QR Codes Expire in 5 Minutes
Each QR code is valid for 5 minutes and refreshes automatically when it expires. The displaying device polls continuously, so the moment a signed-in device approves it, sign-in completes, no manual refresh needed.
Find QR Sign-In in the App
On the main login screen, the QR icon is in the top-right corner. When you are already signed in, open QR Code Login from the app to scan another device or a web panel and log it in.
Email Verification
After creating your account with the magic code method, your email is automatically verified through the sign-in process itself. For social sign-in methods, your email is verified through the identity provider (Apple or Google).
Automatic Verification
Magic code authentication inherently verifies your email address. By receiving and using the code, you prove email ownership. No separate verification step is needed.
Social Provider Verification
Apple and Google have already verified your email. OrbVPN trusts these identity providers, so no additional verification is required.
After You Sign In
Once you are authenticated, OrbVPN routes you based on your subscription. New accounts do not start with a balance, so you will be guided to choose a plan before connecting.
Active Subscription
If your account already has an active plan, you land directly on the Home screen, ready to connect with one tap.
No Active Subscription
If you are a new user or your plan has lapsed, OrbVPN opens the subscription screen so you can pick a plan, redeem a promo code, or add VPN time through the Wallet before connecting.
Apply a Referral Code at Sign-Up
On the sign-in screen you can expand the optional referral code field before requesting your magic code. Entering a friend's code at registration links your accounts so referral rewards are credited correctly.
Device Limit Handling
Each OrbVPN plan includes a set number of simultaneous devices. When you sign in on a new device after reaching your plan's limit, OrbVPN lets you free up a slot on the spot, no need to dig through settings first.
Device Limit Dialog Appears
When you sign in past your plan's device limit, a dialog appears listing your currently registered devices with their names, platforms, and last active times. Your current device is marked and cannot be removed.
Review Your Devices
Browse the list to identify a device you no longer use. Each entry shows the device type (iPhone, Android, Mac, and so on) and when it was last active.
Select and Confirm
Tap a device to select it, then tap Log Out and Log In. That device is immediately signed out, freeing a slot.
Sign In on Your New Device
OrbVPN automatically retries the sign-in with a slot now available. You are connected and ready to go.
Your Device Limit Depends on Your Plan
The number of simultaneous devices is set by your subscription plan, not a fixed number for every account. Higher tiers allow more devices, and device add-ons can raise the limit further. You can also review and remove active devices any time from the app's security and device management settings.
Account Security Best Practices
Use a Secure Email
Register with an email address that has two-factor authentication enabled. This adds an extra layer of protection to your OrbVPN account.
Enable Biometric Lock
After signing in, go to Settings and enable Face ID or fingerprint authentication. This prevents unauthorized access to the app on your device.
Review Connected Devices
Periodically check your active devices in Settings. Remove any devices you no longer use to maintain tight control over your account.
Keep Your App Updated
Always run the latest version of OrbVPN. Updates include security patches, new features, and performance improvements.
Troubleshooting
Magic Code Not Received
Check spam or junk folders. Verify the email address is correct, or tap Use a Different Email. Try Resend after one minute. Corporate email filters may cause delays. Remember the code expires after 15 minutes.
Apple Sign-In Fails
Ensure you are signed into your Apple ID in device settings. Check that two-factor authentication is enabled on your Apple account.
Google Sign-In Fails
Try clearing the Google app cache or signing into your Google account in a browser first. Ensure Google Play Services is up to date on Android.
QR Code Not Scanning
Ensure adequate screen brightness on the TV. Hold your phone steady about 6 inches from the screen. Make sure the camera has permission to access the lens.
Account Created?
Excellent! You are now ready to make your first VPN connection. It takes just one tap to secure your internet traffic and protect your privacy.